Medieval Irish
| Navigation - HomePage - The Rise of Rome - Storm of Arrows - Immortal Fire - Legions Triumphant - Swords and Scimitars - Eternal Empire - Decline and Fall - Wolves from The Sea - Swifter Than Eagles |
Historical Overview Section
Having been conquered in the early medieval period by the Normans and their knights, the later medieval period saw Irish armies change tactics to deal with the increasingly common charging armoured knights. They started to rely on raids against resources, and surprise attacks. This stretched resources of the Normans, reduced their number of trained knights, and often resulted in the chieftains regaining territory. Secondly a lack of direction from both Henry III and his successor, Edward I (who were more concerned with events in England, Wales, Scotland and their continental domains) meant that the Norman colonists in Ireland were to a large extent deprived of (financial) support from the English monarchy. This limited the ability to hold territory. Furthermore, the Norman's position deteriorated due to divisions within their own ranks. These caused outright war between leading Hiberno-Norman lords such as the de Burghs, Fitzgeralds, Butlers and de Berminghams. Finally, the division of estates among heirs split Norman lordships into smaller, less formidable units – the most damaging being that of the Marshalls of Leinster, which split a large single lordship into five.
Politics and events in Gaelic Ireland served to draw the settlers deeper into the orbit of the Irish, which on occasion had the effect of allying them with one or more native rulers against other Normans. Hiberno-Norman Ireland was deeply shaken by three events of the 14th century.
The first was the invasion of Ireland by Edward Bruce of Scotland who, in 1315, rallied many of the Irish lords against the English presence in Ireland. Although Bruce was eventually defeated in Ireland at the Battle of Faughart, near Dundalk, his troops caused a great deal of destruction, especially in the densely settled area around Dublin. In this chaotic situation, local Irish lords won back large amounts of land that their families had lost since the conquest and held them after the war was over. A few English partisans like Gilbert de la Roche turned against the English king and sided with Bruce, largely because of personal quarrels with the English monarchy.
The second was the murder of William Donn de Burgh, 3rd Earl of Ulster, in June 1333. This resulted in his lands being split in three among his relations, with the ones in Connacht swiftly rebelling against the Crown and openly siding with the Irish. This meant that virtually all of Ireland west of the Shannon was lost to the Hiberno-Normans. It would be well over two hundred years before the Burkes, as they were now called, were again allied with the Dublin administration.
The Black Death rapidly spread along the major European sea and land trade routes. It reached Ireland in 1348 and decimated the Hiberno-Norman urban settlementsThe third calamity for the medieval English presence in Ireland was the Black Death, which arrived in Ireland in 1348. Because most of the English and Norman inhabitants of Ireland lived in towns and villages, the plague hit them far harder than it did the native Irish, who lived in more dispersed rural settlements. A celebrated account from a monastery in Cill Chainnigh (Kilkenny) chronicles the plague as the beginning of the extinction of humanity and the end of the world. The plague was a catastrophe for the English habitations around the country and, after it had passed, Gaelic Irish language and customs came to dominate the country again. The English-controlled area shrunk back to the Pale, a fortified area around Dublin.
Additional causes of the Gaelic revival were political and personal grievances against the Hiberno-Normans, but especially impatience with procrastination and the very real horrors that successive famines had brought. Pushed away from the fertile areas, the Irish were forced to eke out a subsistence living on marginal lands, which left them with no safety net during bad harvest years (such as 1271 and 1277) or in a year of famine (virtually the entire period of 1311–1319).
Outside the Pale, the Hiberno-Norman lords adopted the Irish language and customs, becoming known as the Old English, and in the words of a contemporary English commentator, became "more Irish than the Irish themselves." Over the following centuries they sided with the indigenous Irish in political and military conflicts with England and generally stayed Catholic after the Reformation. The authorities in the Pale grew so worried about the "Gaelicisation" of Ireland that, in 1367 at a parliament in Kilkenny, they passed special legislation (known as the Statutes of Kilkenny) banning those of English descent from speaking the Irish language, wearing Irish clothes or inter-marrying with the Irish. Since the government in Dublin had little real authority, however, the Statutes did not have much effect.
Throughout the 15th century, these trends proceeded apace and central government authority steadily diminished. The monarchy of England was itself thrown into turmoil during the Wars of the Roses, and as a result English involvement in Ireland was greatly reduced. Successive kings of England delegated their constitutional authority over the lordship to the powerful Fitzgerald earls of Kildare, who held the balance of power by means of military force and widespread alliances with lords and clans. This in effect made the English Crown even more remote to the realities of Irish politics. At the same time, local Gaelic and Gaelicised lords expanded their powers at the expense of the central government in Dublin, creating a polity quite alien to English ways and which was not overthrown until the successful conclusion of the Tudor reconquest.
Allied Contingents
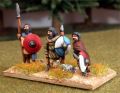
- Anglo-Irish, Later : Any Storm of Arrows 28 4-12 Longbows of various qualities, and some Hvy Wp too, plus LF or MF padding from the Kerns
Using the army in FoG
This is based on the list below, at 800 pts and 15mm, though most of it will hold true for other sizes and variants.
- Obviously you need terrain, steep hills best avoided as you can be shot on them so forests or villages are better.
Troop overview:
- Mob - I deploy these in front of the baggage - the chances are that you will have gaps later in the game and they just might stop LH!
- LF - you can have some average bow (but they are much more expensive than the poor jav, 5 pts per base instead of 2). The LF don't really have a role as such, they won't hold terrain against anyone but the puniest enemy. If you are fighting a foot army who shoots then you might want to use them as a screen for the heavy foot, as they can only be shot down one level. If you do this then be careful to avoid being autobroken by losses, and also make sure you have a spare BG (two in the line and one behind to swap when one gets disrupted). In close terrain it is also good to deploy in 3's, giving rear support.
- MF kerns - these go into any close terrain you want to hold (or take, but this might be overly ambitious if the enemy has any MF). If they aren't needed for that then they can provide rear support to the longbow. Finally you can bring them up to cover gaps behind the main battle line and prevent flank charges.
- LH - assuming the enemy has LH, they will probably be better than you. Discretion is definitely the better part of valour here.
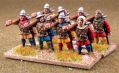
- HF - this is the business end of the army. If you can deploy deep, do so. this may mean putting the 6 in the front rank, and an 8 in the second line. You probably want to be 3 deep as well to start. The basic principle is to make contact with the enemy and then use your status to outlast them. Legionaries are of course the exception here!
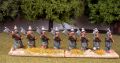
- MF Longbow - these are of course critical to the army, and need to be deployed with the HF. If you can stay out of open ground that would be ideal, but don't be too concerned about it, although you want to avoid enemy foot in the open. These units tend to be problematical because you don't really want them together (they are a target for foot and Kn and Cv will avoid them) - they are also average undrilled and you have only the one commander. On the plus side, if he dies in combat you probably only have to test one unit!
- Cv - most effective as a reserve, either behind the LH (at a distance) or the HF (where they provide rear support). Most things that don't evade will beat you, so you want to avoid any tests for charging if you can.
Considerations:
- Flank marching and ambushing: for the most part, these aren't worth it. The candidates for a flank march are mostly weak troops (aside from the Cv), and there is the risk they don't arrive, or they arrive before the HF are in range. Ambushing with the LF might gain ground, but will mean deploying the better troops earlier. The best bet is MF to gain ground.
- Usage: The base rule is the LF never fight. Unless needed for a missile screen they don't get too close to the battleline, in case they have to test for routs. You really only want to fight with the longbow and the HF (and possibly the Cv). With 18 BG's you can lose all of them without losing the game (though it's not clear what you can do at that point except skulk in the woods).
- Refinements: It is possible to add more to the allied forces, either more galloglaich or cavalry. Finally the armoured cav could be javelin armed - which is helpful in terms of avoiding charges (and tests!). More kerns are of cause available if you feel the need. Overall probably the best is to take the galloglaich, make them superior and put them behind the main irish galloglaich to provide rear support. An IC would be useful, both for initiaitve and of course for tests: the easy target is to lose the second MF kern unit, but if you do that then don't expect to hold any rough going. Losing the mob and a unit of LF would be enough, but again this undermines the main advantage, which is the sheer size of the army.
- Isn't the LB in The Anglo-Irish Allies list limited to a total of 8 Bg's? I take it you mean 8 bases, not Bg's - if so you are correct, the list was wrong, 2x4 LB should be the maximum.
Useful Links
User-contributed links about this army:
- Medieval Irish DBA Figure Gallery for this army - from Fanaticus
- The tomb of Felim O'Connor (d.1265) at Roscommon Abbey
- The Burke effigy at Glinsk in County Galway, late-14th century
- Islesmen or Gallóglaich, 12th-14th Centuries by Ian Heath
- A miniature of MacMorogh, the Irish chieftain, coming to confer with the Earl of Gloucester, 1399
- Irish Kern, 14th-15th Centuries by Ian Heath
- Irish Horseman c1400 by Ian Heath
- Irish Chieftain, Art Oge Macmurrough Kavanagh,14th-15th Centuries, by Ian Heath
- Effigy at Oronsay Priory, 14th or 15th century
- Gallóglaich, 14th-15th Centuries by Ian Heath
- Drawing of the remains of mural decoration in Holycross Abbey, Co. Tipperary, Ireland, late 14th-early 15th Centuries.
- Drawings on the wall of Abbey Knockmoy, Co. Galway, Ireland, 15th Century
Allies
Put information on allied contingents here - including recommendations on which to use, and why
15mm Manufacturers supplying Irish-type figures for this army
Also see generic or English Medieval era ranges from other manufacturers - try the 100 ys War English -Britain page for a full medieval figure listing.
A listing of who supplies what can be found in my 15mm Suppliers directory
You can see some of the figures in the Ancients Photo Gallery also on this site
|
|

|
|
- Essex Miniatures
- Donnington have some "New Era" (ie brand new) Viking and Irish castings
- Museum Miniatures
- Gladiator Miniatures by Fighting 15's (Previously Black Hat)
- Old Glory 15's,
- Magister Militum
- Minifigs
- Irregular Miniatures
- Lancashire Games
- Lo Hobbi.t.Studio - dedicated range
- QRF Models A dedicated Irish range can provide most of the infantry and bowmen. Further figures in the TW (Tudor Wars) & EW (Elizabethan Wars) ranges.
Core Troops
Which troops are absolutely needed for this army, and what are your thoughts on how to organise, paint and buy them.
Army Lists
Sample army lists for this army
Name of Army / Date
- 4x6 LF poor jav
- 10 mob
- 2x6 LF poor jav
- 1x4 and 1x6 LH jav lt sp avg
- 1x8 HF HW S ud
- 1x6 HF S HW UD
- 2x8 HF HW S UD
- 6xMF Lt sp avg protected
- 2x6 MF P avg UD longbow/swds
- 1x6 MF lt sp Protected avg
- 1x4 cav Arm L/swds
This is the List used above for tactical summary
- 10 Mob
- 6x6LF unp poor, jav, light sp
- 4 LH av jav, light sp
- 6LH av jav, light sp
- 4 Cv arm sup Lance/sword
- 2x6 MF prot av, Lt sp
- 2x6MF anglo irish Prot av LB, sword
- 3x8 HF Prot Sup Hvy weapon
- 6 HF Prot Sup Hvy weapon
- FC
- 2 TC
- Allied TC
Remember to leave a line before you copy the above section as a template for your own list
eBay Listings
UK Bookstore