Historical Overview Section
The Franks were Germanic tribes first identified in the 3rd century living north and east of the Lower Rhine. From the third to fifth centuries various groups of Franks raided Roman territory while other Franks joined the Roman troops in Gaul. In the climate of the collapse of imperial authority in the West, the Frankish tribes were united under the Merovingians and conquered all of Gaul save Septimania in the 6th century.
From the 3rd century onward there was continual friction between the Dominate Romans and the Frankish tribes as many kept invading and raiding Roman territory, including client states such as those of the Batavii and Menapii. When Dominate Roman administration collapsed in Gaul in 260 due to a joint invasion of Franks and Alamanni, The Germanic Batavian Postumus was forced (yeah, right, "forced" - ho humm..) to usurp central authority to restore order, and Franks became a central part of the Foederate Roman army as well as a major enemy. This proximity has led many historians to postulate that Frankish armies and warfare was organised far more closely along Roman lines than is catered for under this list.
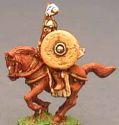
The primary sources for Frankish military custom and armament are Ammianus Marcellinus, Agathias, and Procopius, the latter two Eastern Roman historians writing about Frankish intervention in the Gothic War. Writing of 539, Procopius says: At this time the Franks, hearing that both the Goths and Foederate Romans had suffered severely by the war . . . forgetting for the moment their oaths and treaties . . . (for this nation in matters of trust is the most treacherous in the world), they straightway gathered to the number of one hundred thousand under the leadership of Theudebert and marched into Italy: they had a small body of cavalry about their leader, and these were the only ones armed with spears, while all the rest were foot soldiers having neither bows nor spears, but each man carried a sword and shield and one axe. Now the iron head of this weapon was thick and exceedingly sharp on both sides, while the wooden handles was very short. And they are accustomed always to throw these axes at one signal in the first charge and thus to shatters the shields of the enemy and kill the men.
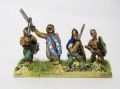
His contemporary, Agathias, says: The military equipment of this people (the Franks) is very simple. . . . They do not know the use of the coat of mail or greaves and the majority leave the head uncovered, only a few wear the helmet. They have their chests bare and backs naked to the loins, they cover their thighs with either leather or linen. They do not serve on horseback except in very rare cases. Fighting on foot is both habitual and a national custom and they are proficient in this. At the hip they wear a sword and on the left side their shield is attached. They have neither bows nor slings, no missile weapons except the double edged axe and the angon which they use most often. The angons are spears which are neither very short nor very long they can be used, if necessary, for throwing like a javelin, and also in hand to hand combat
The Frankish kingdoms were replaced by the Merovingians, a Salian Frankish dynasty that came to rule the Franks in a region largely corresponding to ancient Gaul from the middle of the fifth century
Using the army in ADLG
- Maximise the Elite Heavy Swordsmen as a minimum, and consider the Frank option very seriously. This will mean going with the Strategist, and clustering most if not all of the Impetuous foot in one big command with the big boss.
- A good LI screen can help stave off the need to charge impetuously for a while.
- Having too many Impetuous cavalry may make command and control impossible - unless you accept that they are a sacrificial missile to occupy the enemy while your foot overwhelm them
Using the army in ADLG against Huns or similar
Assume you lost the initiative and are in a mostly open table. First, what is each side’s “theory of victory” in this match-up? If you don’t have conception or plan about how you win you probably won’t…
Vikings: You need to force the Huns to actually fight you, while avoiding being flanked decisively. The base calculation here is that if you advance 2 UD every turn, starting from 5 UD in at deployment AND keep the Huns in front of you in turn 5 you are 15 UD and in turn 6 you are 17UD across the table and at about that point the Huns have to fight or flee off the table. Now the Huns know this as well so they are going to try and avoid this and try and slide around your side so they aren’t going straight back, they will try and arrange to fall back somewhat diagonally to buy themselves more time/room, try to get you to spend time not advancing and pushing them, etc. The nastiest thing they will do is shoot then fall back and march to the other side of the table YOU MUST NOT LET THIS HAPPEN. Your job as a Viking is to nullify as much of this BS as possible and push them back or into a corner where they have to fight.
So how do you do this?
First, you deploy carefully. DO NOT leave multiple open flanks. Bow armed cavalry are basically just as expensive as Spearmen so are unlikely to outnumber the legions. So you should be thinking in terms of one elements of HI for every cavalry. If a Spearman or Swordsman charges a cavalry it is a fight in your favour at +1 (armor) vs. +0 (elite) this is a good fight for the legion. Stay together don’t expose two flanks, you probably can’t avoid exposing one. The Huns might/will try and turn your flank. The one thing you don’t want to do is have your Medium Foot groups isolated on their own – especially on the open flank. If you do that you can guarantee that the Hun will send every man on a horse to kill them. They are much much more vulnerable than the Spear line. This goes equally for small groups of cavalry or light cavalry in a Dark Age army. If you put them somewhere the shooty cavalry can get at them they will do it and do it hard. They can’t compete with masses of bow armed cavalry – don’t try. This is equally true for a Roman cavalry group. NO the Dark Age guys can’t take a few cavalry and “skirmish” with the Huns. That leads to a lot of dead Dark Age cavalry. They aren’t useless but you have to use them extremely careful.
Put that group in one of two places depending on the terrain. It either goes in the middle of your army OR it goes on the edge of the army next to a waterway. Both of these are dangerous locations for our Hun to mass cavalry and you would in fact like them to do so. Why? In either location you push forward and there is a line of legions that are placed to cut off the retreat routes. Sure they can just flee away but that is what you want and eventually the Hun is going to flee and want to turn to one flank or the other to find more space. This is the secret sauce if you will of pushing someone off the table. They need to make this turn while they still have table space to get out of the way. If they can’t march (and more on marching below) that means the cavalry is going to turn and move 3 UD one turn and maybe more 4 more UD the next turn. You need to be able to catch them before they squirt off to the side of your legion by any means necessary. Your ZOC extends out 1 UD and as you advance you can slide 1 UD to the side for free. Always be looking to get the Hun into a position they can’t turn away to the flank. Normally, a cavalry army needs to start thinking about this maneuver when they are about 5 UD from their base table edge at least.
5UD is usually the magic point as that is the last spot they can be assured of not fleeing off the table and being pretty sure they can turn and start moving sideways. When the Huns decide they are going to try and can opener your flank – be ready for that and start turning. Be ready to get heavy troops all the way to the table edge or nearly the table edge. This is a place the M Cav can help if you are careful. They move a bit faster so you can use them to fill the last little gap BUT they need infantry supporting them or they are victims.
Get the rest of your army turning as well – remember you have a foot unit for every MC Bow. Yes the LC Bow are annoying and will shoot at you and you want to keep them from getting behind you but fundamentally they aren’t that dangerous. One key to remember is that you are marching on an interior line, behind your rear, so you have less distance to cover than the cavalry player. This can often let you match any big turning/flanking maneuver.
Once all this has happened do what you can to prevent the MC from being able to march move again. March moves are sneakily dangerous.
Your goal here to create a fight where the Huns are forced to fall back to and edge somewhere so they can’t simply keep retreating. That can be their back edge, your back edge, or a side – somewhere they are going to commit their troops. DON’T let them commit then slide sideways to an open part of the table. That is how you lose. If you have to this is the point to sacrifice some cavalry/light cavalry/medium infantry to hold them in place while the legions catch-up.
When you do this ALWAYS charge them every turn you can. It forces them back – closer to an edge and it stops half their shooting. Even better is if you can force them back and break up their groups. That over time will pip starve them and they will become less efficient and/or leave you elements you can scoop up by preventing flees. Similarly, don’t let your army get broken up into tiny groups. Each Corps can fairly easily support two groups, but once you are at three or more you risk being unable to charge due to lack of pips.
LMI and especially MI shooters are extremely useful here. DO NOT place them alone on your flanks as unsupported they are vulnerable and a good target. Nestled safely in the midst of heavy infantry they provide powerful firepower and are like all weak points in an unpleasant place to attack.
Terrain considerations:
Always try for the waterway, it is generally helpful. If you get a waterway don’t bother with the village it isn’t helpful as it most likely is sitting on your base edge on the waterway which is not a useful spot.
Don’t get overly obsessed with RGo especially of the fields/brush sort. Unless you have a lot of medium infantry – especially medium infantry that shoots (not a forte) it doesn’t make that much difference. Its biggest value is letting LI stand up to mounted so it is of some value but not hugely. Next biggest use is dummy ambush markers preventing marches..
If you are somewhere that isn’t steppes/plains then you want DGo. The single most dangerous thing you can place for the Huns is a piece of DGo (or impassable) sitting on their baseline dividing up the deployment zone. This generally will compact their army which is good and even better dramatically cut down their ability to march away from your advance. Watch out as the counter-move to this is often to flank march. That is not terrible for you unless you deploy badly and get caught out by it.
Useful Links
User-contributed links about this army. Add links in this format:
- Early Frankish DBA Figure Gallery for this army - from Fanaticus
- Early Franks DBA Figure Gallery for this army - from Fanaticus
- Early Franks DBA Figure Gallery for this army - from Fanaticus
- Early Franks DBA Figure Gallery for this army - from Fanaticus
15mm Manufacturers supplying figures for this army
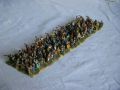
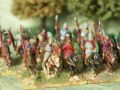
You can see some of the figures in the Ancients Photo Gallery also on this site
|
|
|
|
- Essex Miniatures Slavs and Goths
- Donnington Slavs & Goths
- Museum Miniatures Mounted asiatics
- Black Hat Miniatures (previously Gladiator Games) Dark age range
- Old Glory 15's, Slavic range
- Magister Militum - Goths, dark Ages
- Minifigs - Dark age goths
- Irregular Miniatures Dark Ages ranges
- Lancashire Games - Goths, Sarmatians
- Tin Soldier - Slavic Range
- Vexilia Maybe some of their Eastern European medievals..?
- Isarus - sold by 15mm.co.uk Gothic range
- Outpost Wargame Services - Avars & Slavs
- AlainTouller Figurines - Slavs
- Two Dragons - Saxons (at a pinch)
- Khurasan Miniatures - Avars
- Viking Forge Sarmatians, Saxons
- Splintered Light. Possibly their v. nice Saxons may be OK for some foot
- Battle Line Miniatures - Sarmatians, Goths
- Miiature Wars - Sarmatians, Slavs
- Khurasan Miniatures German infantry and cavalry
- Legio Heroica have a Rome's Enemies range with various Germanic and Gothic horse and foot
Army Lists
Sample army lists for this army
300 Points
- 8 Elite HI Sword Impetuous
- Strategist
--
- 8 Elite HI Sword Impetuous
- Ordinary General
--
- 6 Elite HI Sword Impetuous
- General
- 5 LI
--
- 4 Elite HC
- General